I LOVE Eggs Benedict. It is my go to choice when I go out for breakfast. I don’t eat it often because I don’t go out for breakfast much. So, when we had a big Arsenal game on a little later than usual, it presented the opportunity for a great breakfast. We had English Muffins and eggs at home, so all we needed was a little ham. I prefer ham over Canadian bacon myself. We get it cut paper thin at the delly too.
The recipe is pretty easy.
The technical part is the hollandaise souce which you do in a double boiler. Start by whisking the yolks and the lemon juice, and then add the molten butter slowly as you whisk, then add a good pinch of yoru favorite red pepper. We don’t have Cayanne, so we use Peri Peri. WIth the eggs poached and the ham heated and the muffins toasted, you assmble and cover in the yummy sauce.
Growing up, we used to fight about who got the bone marrow when my mom would make marrow bone soup. Then I came to America and had roasted marrow bones in a restuarant. I was in love. I found a butcher who would cut long bones for me so they lay flat and roast them up. They are salted a bit before they go in the oven, then finished with lemon zest and parsley and some red pepper flakes. I serve them with toasted bagette finished with a garlic rub. It is a magicla meal.
Because I am baking bread, we often have some left over bread to use, and bread pudding seems on. Its pretty easy, You make a custard, you soak the bread like you are making french toast, and bake it in the custard then cover it with a sauce, butter, cream, brown sugar and vanilla heated till smooth, and serve it with vanilla ice cream! Delish.
Ingredients
4 cups day-old bread (cubed; brioche or French bread works great)
2 cups milk
3/4 cup sugar
2 eggs
2 tbsp melted butter
1 tsp vanilla extract
1/2 tsp cinnamon
Pinch of salt
Instructions
Prep: Preheat oven to 350°F (175°C). Grease a baking dish.
Soak bread: Place bread cubes in the dish.
Make custard: Whisk milk, sugar, eggs, butter, vanilla, cinnamon, and salt.
Combine: Pour over bread; gently press so all pieces absorb liquid.
Add extras: Sprinkle in raisins or chocolate if you like.
Bake: 40–45 minutes, until set and golden on top.
Cool slightly before serving.
Sauce
1/2 cup butter
1/2 cup brown sugar
1/4 cup cream
Splash of vanilla
Melt together over low heat until smooth—pour over warm pudding.
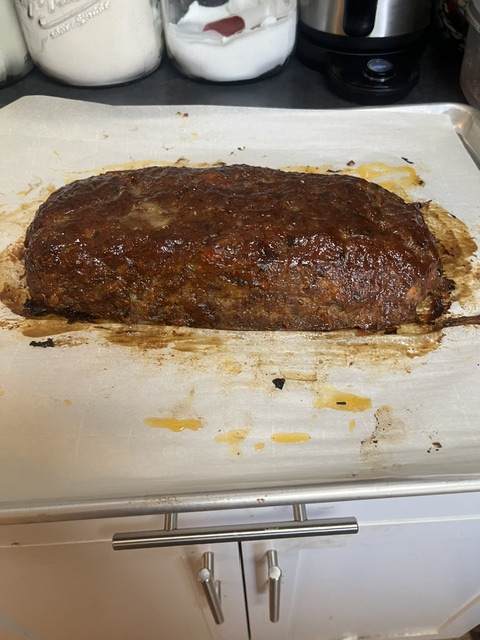
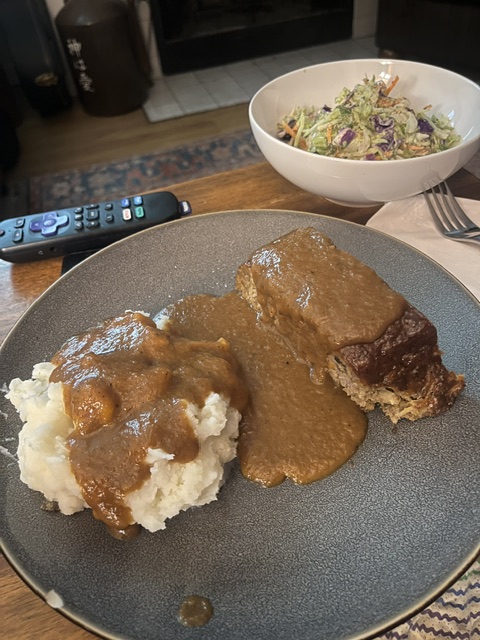
I love when I crave something. It usually is some sort of comfort food. Heather and I werre talking and I said, “I have been thinking about meatloaf. Meatloaf with mashed potatoes, meatloaf sandwhiches, and meatloaf ravioli in sage brown butter sauce. So, she said, “Well, make a meatloaf!”
So, built a deeply flavorful, crusted, tender, sliceable, week-night-luxury meatloaf—the kind that makes people go quiet after the first bite. This version layers umami + aromatics + texture + glaze contrast so it tastes like something between classic comfort food and a chef’s upgrade.
Meat Blend (key to greatness)
I used:
1 lb ground beef (80/20)
1 lb ground pork
This combo keeps the loaf juicy, rich, and structured.
Aromatic Base (flavor engine)
I ssautéd until soft:
1 medium onion, finely diced
3 cloves garlic
1 celery stalk, minced
1 carrot, finely minced
4 mushrooms finely chopped
1 tbsp olive oil
pinch salt
Impoirtant note: Let cool before mixing.
This is the difference between good and restaurant-level meatloaf.
Binder (keeps it tender, not dense)
Mix together:
1 cup panko breadcrumbs
½ cup milk
2 eggs
2 tbsp Worcestershire
2 tbsp ketchup
1 tbsp Dijon mustard
some parm and bread crumbs if needed to get the liquid down
Let soak 2 minutes.
Flavor Boosters (the secret layer)
Add:
½ cup grated parmesan
2 tbsp chopped parsley
1 tsp smoked paprika
1 tsp kosher salt
½ tsp black pepper
optional: ½ tsp thyme
Combine
Gently mix:
meat + sautéed vegetables + binder + boosters
Do not overwork. Think folding, not kneading.
Shape into a free-form loaf on parchment (better crust than a pan).
Then to get that yummy crust:
Mix:
⅓ cup ketchup
2 tbsp brown sugar
1 tbsp Dijon mustard
1 tsp Worcestershire
splash apple cider vinegar
Brush half before baking, half midway through.
It really does create that lacquered tangy crust.
Let it cool for at least 10 minutes before slicing.
Then, to create a great gravy, I sliced up an onion, and added them to a pan with all the pan juices I could capture. Once they caramalized, I added some beef stock, soy, red wine vinegar, worcester sauce, and dijon mustard and cooked it down till it tasted good. Then I ran the immersion blender and added a tablespoon of flour and cooked it down till I liked the texture. I turned it down and added 2 tablesoons of cold butter striring it in to make the gravy smooth. It is DELICIOUS.
I love French food. This dish is a perfect example of how the French look at finishing dishes so they taste so good. To make Steak Au Poivre, it makes sense to get the best filet mignon you can find. The dish depends on a great piece of meat. Luckily for us, we had a wonderful filet in the freezer. You want to get the meat to room temperature and then salt them on all sides about a half hour before you start cooking. While they are resting, you want to crush black pepper corns in a pestal till they are roughly broken. This does not work with ground pepper nearly as well. Trust me on this. After the pepper is crushed, coat the meat on all sides by pressing the meat down into the pepper. Reserve the rest for the sauce.
You sear the meat on all sides for a minute or two in butter and a little neutral oil to get a good crust. Then drop the meat onto a cookie sheet and put it in the oven to get to medium rare. Keep an eye on it so it doesn’t go over.
The sauce you drop some butter into the pan along the chopped shallots, and a sprig of thyme. Cook till they are soft, then add the reserved pepper, and remove the thyme aftet it sizzles, Add some brandy, and light it. Add the beef stock and cook it down a little, then add the cream adjust for salt and get it into a yummy sauce. Plate the filet, then add the sauce.
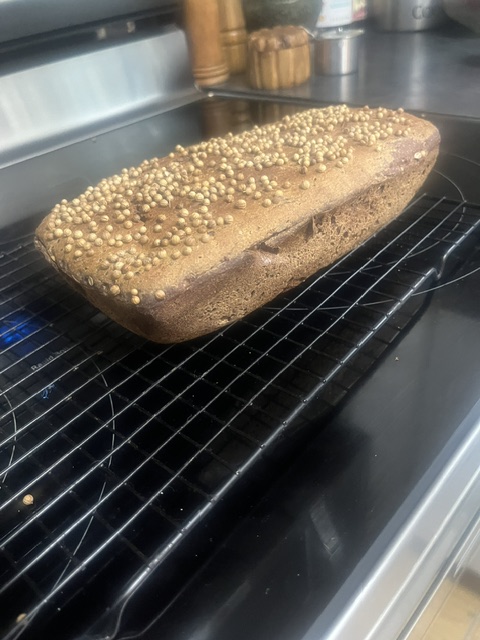
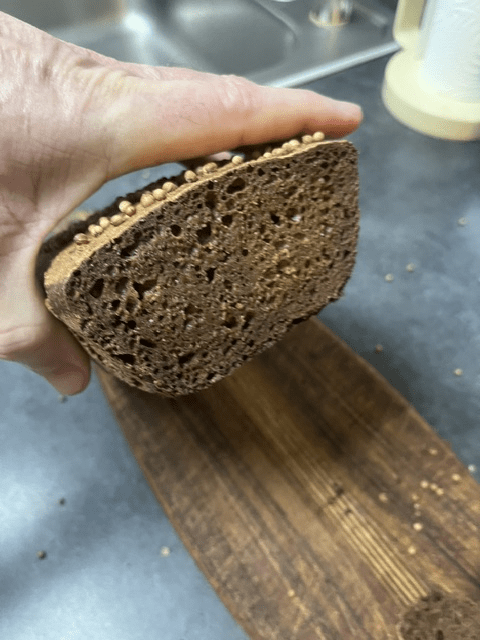
Growing up, Russian Black Bread was something that my mom served. I gerw up enjoying eastern Euorpean fare and black bread with borscht, for example, was sometimes on the menu. It’s funny, but its been in the back of my mind to make a russiand black bread since I started making bread regularly. The recipe is very different from regular bread making. It’s a no kneed bread with a very wet flour. Russian black bread is deep, slightly sour, mildly sweet, and intensely rye-flavored. The classic version is Borodinsky bread, made mostly with rye flour, molasses, and coriander seeds. Since I’ve been working with sourdough,I chose to make a naturally fermented version, which is closest to the real thing.
Ingredients
Rye Sour Build (8–12 hrs before)
50 g sourdough starter
100 g dark rye flour
100 g warm water
Mix and let ferment overnight.
Dough
All of the rye sour
300 g dark rye flour
50 g bread flour (optional but helps structure)
280 g warm water
2 tbsp molasses
1 tbsp honey
1 tbsp cocoa powder (traditional for color, not chocolate flavor)
1 tsp salt
1 tbsp ground coriander
1 tbsp whole coriander seeds (for topping)
1 tsp instant yeast(optional but traditional for lift)
Instructions
1. Mix
Combine everything except the topping seeds.
Important: Rye dough will feel more like thick batter than wheat dough. That’s normal.
No kneading required.
2. First Rise
Cover and ferment:
2–3 hours at ~75°F
It will rise some but not double.
3. Pan It
This bread must be baked in a loaf pan.
Grease a pan
Scrape dough in
Smooth top with wet spatula
Sprinkle whole coriander seeds
4. Final Proof
Let rise until slightly puffy:
45–60 minutes
5. Bake
Bake at:
375°F / 190°C
For 45–55 minutes
Internal temp should reach about 205°F.
6. The Hard Part: Wait 😄
Wrap the bread in a towel and let it rest 12–24 hours before slicing.
This allows the crumb to set properly, otherwise it can be gummy.
It turned out perfectly. It was deliciously sour and has that beautiful fragrance of teh coriander and lovely rye flavor. Heather when tasting it said, “THAT is Russian Black Bread.”
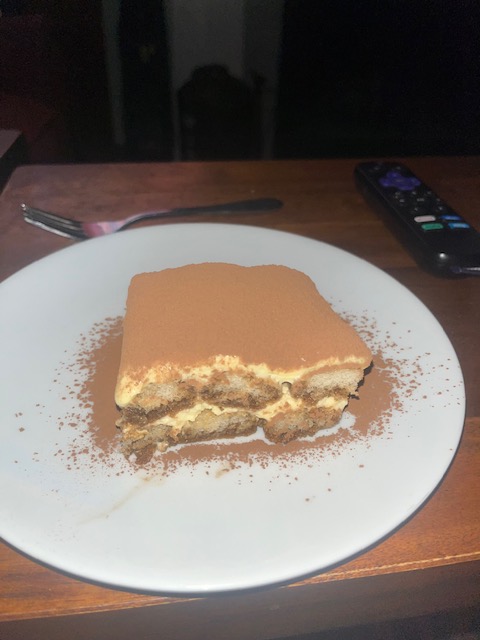
Whenver I go out for dessert, my go to is to order tiramasu becuase it’s not too sweet. I am not a sweet dessert guy at all. That said, I LOVE tiramasu. I made the decision to make it since it is one of my favorite desserts and after I made the Death by Chocololate cake for Heather, I felt that she needed a new cake to enjoy. It s urprisingly easy thing to make. It’s basically an egg whipping thing. You do need top quiality lady fingers, so I picked up a sleeve of Bonobi Italian lady fingers and I was off.
It’s really pretty easy to make, taking no more than about 45 minutes. The time after it’s built is all waiting till you finish with the chocolate just before serving.
Ingredients (8–10 servings)
Mascarpone cream
6 large egg yolks
¾ cup sugar (150 g)
1½ cups mascarpone (340 g), cold
1 tsp vanilla
pinch salt
4 egg whites
2 tbsp sugar (extra)
Soaking mixture
1½ cups strong espresso (cooled)
3 tbsp dark rum or Marsala (optional but recommended)
Structure
2 packages savoiardi (ladyfingers)
Finish
high-quality unsweetened cocoa powder
optional: shaved dark chocolate
Whisk together:
egg yolks
¾ cup sugar
Place over a barely simmering double boiler.
Whisk constantly 6–8 minutes until:
pale
thick
tripled in volume
leaves ribbons when lifted
Remove from heat and cool slightly.
Whisk in:
vanilla
salt
mascarpone (one spoonful at a time)
Result: smooth, glossy cream.
Step 2 — Whip the Egg Whites
Whip whites to soft peaks.
Add remaining 2 tbsp sugar gradually.
Whip to medium peaks (not stiff).
Fold gently into mascarpone mixture.
Now you have the classic airy tiramisu cream.
Step 3 — Prepare the Espresso Dip
Combine:
espresso
rum or Marsala
Dip each ladyfinger 1 second per side only
They should soften—but hold shape.
Step 4 — Assemble the Layers
In order:
Layer 1: soaked ladyfingers Layer 2: mascarpone cream Repeat once more
Smooth top layer carefully.
Cover and refrigerate minimum 6 hours (best overnight)
This rest time is what transforms good tiramisu into unforgettable tiramisu.
to make it look like world class tiramisu I froze it for 75 min before cutting with a hot knife to serve.
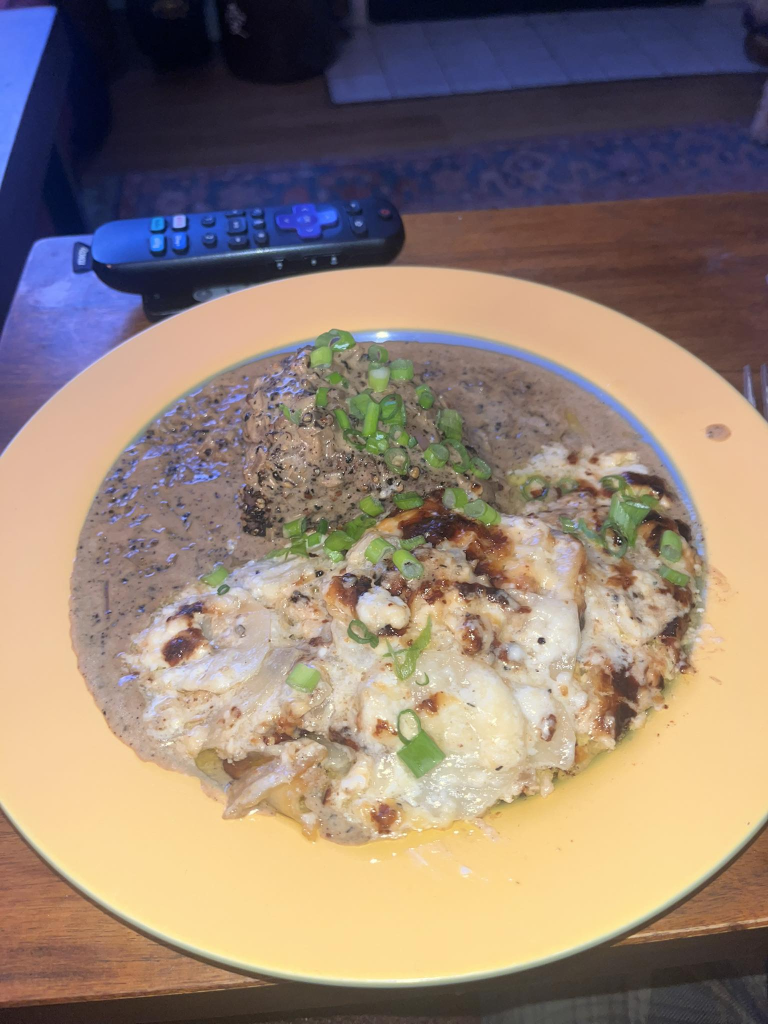
When I mastered pasta, I felt like my fettuccine was perfection. Then I learned about Hayden Flour Mills and their Pasta Flour. the bite is perfection. I use one whole egg and 3 egg yolks to make the pasta in about a cup of flour. After it rests in the fridge for about a half hour, I run it through the press to the 4th press which gives the best bite for my taste. To prepare the chicken, I use a technique that I saw on Chopped, when a Chinese chef boiled the breast to keep it moist, and once I mastered it, it totally works. I put the chicken in the water till the exterior is fully cooked, then I slice it across the grain, drop it into the water and as soon as it is cooked take it out. It really does make a beautifully moist breast.
The ingredients i use are:
Chopped shallot
Several cloves of finely chopped garlic
A good pinch of red pepper flakes
an inch of finely chopped ginger (optional)
A tub of gfresh pesto.
The zest of one lemon
The process is to cook the shallots and red pepper flakes till they are soft, add the garlic and ginger and a ladel of pasta water when its ready. the pasta needs to be cooking at this time because the pesto does not like heat that much. Get the pesto mixed to a nice consitency, then drop the chicken into the pan making sure the pesto covers it. Add the pasta into the pan once it has boiled for a minute. You need to judge if you ened another ladel of pasta water do get it nice and glossy. Mix the zest and serve onto warm plates. It is a fantastic dish. Very moreish.