I've had a great life...its been a roller coaster ride....but backwards...super exhilarating on the uphills and terrifying on the downhills ...this is the tale of that experience on planet earth
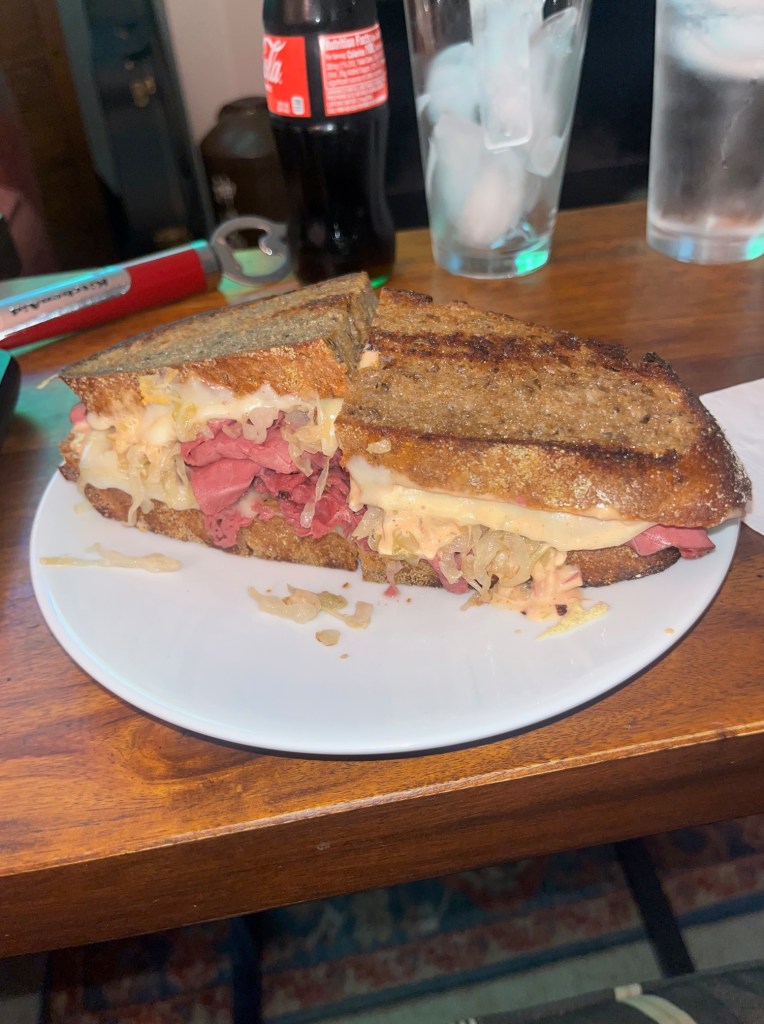
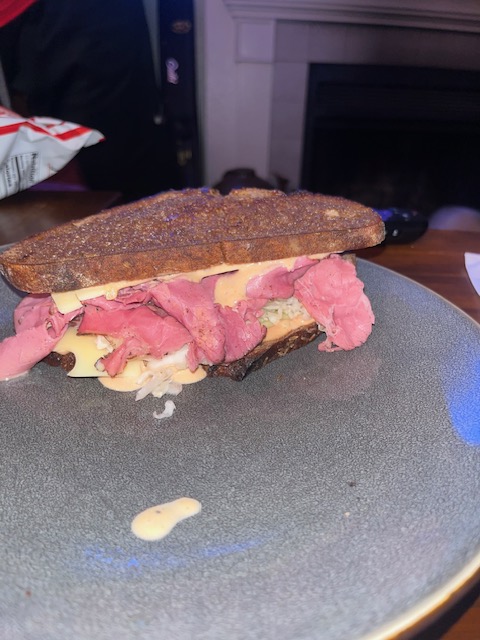
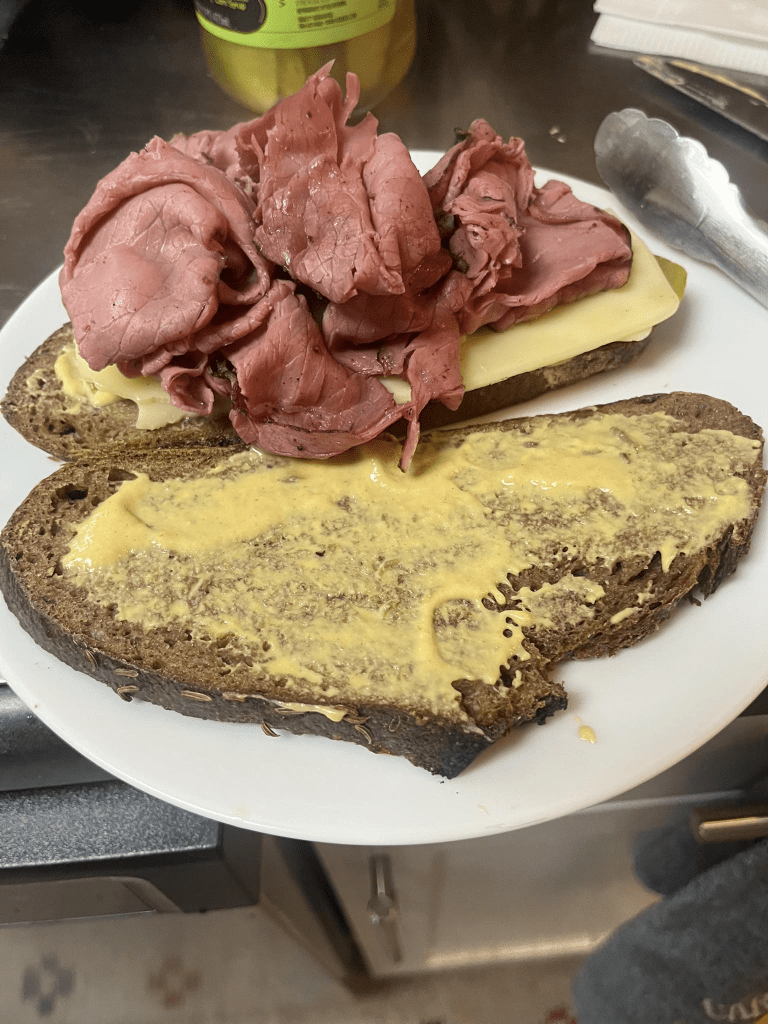
Having made a great loaf of Rye Bread, we chose to make the Ultimate Rueben sandwich. It started out early in the morning when we went to the store to find the ingrtedients we needed as soon as the deli opened. We found great pastrami, and had it sliced paper thin. Most Rueben’s fall flat with the Russian Dressing. I chose not to!
Mix:
½ cup mayo
2 tbsp ketchup
1 tbsp Dijon
1 tsp Worcestershire
1 tbsp finely chopped shallot
1 tbsp chopped pickles (or relish)
Squeeze of lemon
Black pepper
And let it sit 15–30 min in order to wake up.
Next, the Sourkraut. Most people ruin Reubens here.
Not me!
First I drained it
SQUEEZED it dry (seriously—like wringing a towel)
Quick sauté in butter + pinch caraway seeds
To get it warm, and slightly toasty—not wet and sour sludge.
Next, the meat.
Game changer:
Steam or gently warm it (NOT microwave dry)
A splash of water, covered pan, low heat
Hot + moist = sandwich magic
Finally, build it right
On my excellent rye bread:
Butter outside of bread
Inside layer:
Swiss cheese
Meat (generous…be honest with yourself)
Kraut
Dressing
More Swiss
Cheese on both sides = glue + melt
Medium-low heat
Press gently (don’t smash it flat)
Flip once
Looking for deep golden, slow melt Not rushed. Not burnt
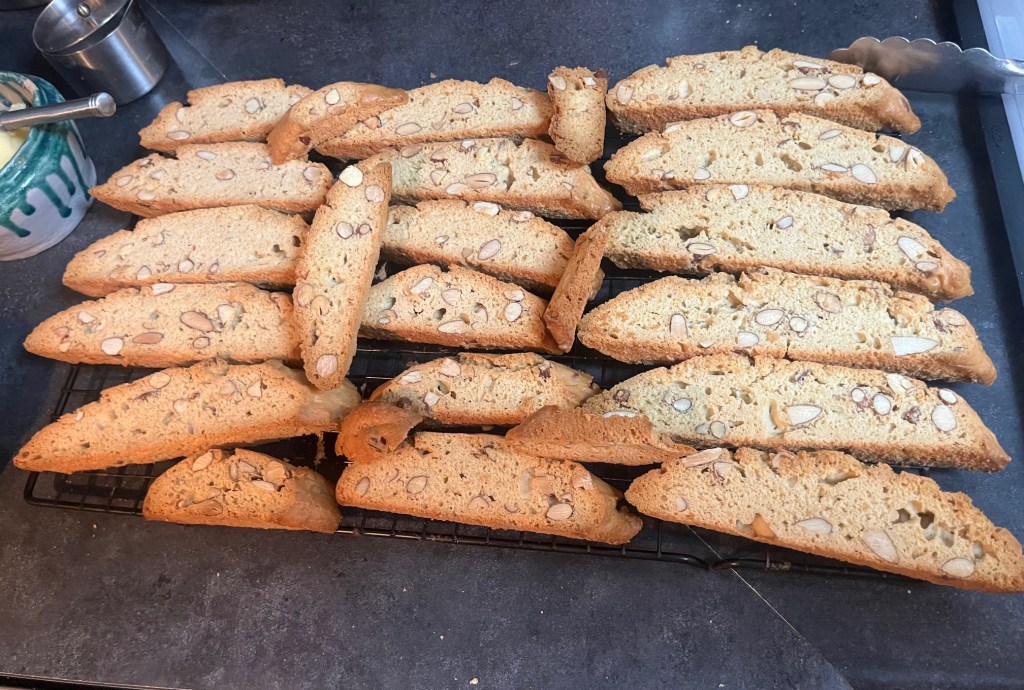
I LOVE biscotti with my coffee in the morning. I used to get one at the little coffee card outside my office back in the day. When I sold my office and moved, I sort of missed out on that biscotti fix. All the ones I tried were not as good as the one she had at that cart. After my divirce, I resolved to make the perfect biscotti.I tried several recipies till I found this one, Nona’s Biscotti, in Gourmet, and have never looked back.
Ingredients
1 cup (200 g) sugar
½ cup (1 stick) unsalted butter, melted
3 Tbsp. brandy
2 tsp. pure almond extract
1 tsp. pure vanilla extract
1 cup whole almonds with skin, lightly toasted, cooled, and coarsely chopped
3 large eggs, lightly beaten
2¾ (344 g) cups all-purpose flour
1½ tsp. baking powder
¼ tsp. kosher salt
Step 1
Stir 1 cup (200 g) sugar, ½ cup (1 stick) unsalted butter, melted, 3 Tbsp. brandy, 2 tsp. pure almond extract, and 1 tsp. pure vanilla extract with a wooden spoon in a large bowl to combine. Add 1 cup whole almonds with skin, lightly toasted, cooled, and coarsely chopped, and 3 large eggs, lightly beaten, and stir vigorously to combine. Sift in 2¾ (344 g) cups all-purpose flour, 1½ tsp. baking powder, and ¼ tsp. kosher salt and stir until just combined and no floury streaks remain. Chill dough, covered, 30 minutes
Step 2
Place rack in center of oven; preheat oven to 350°F.
Step 3
Using moistened hands, divide chilled dough in half and form 2 (16×2″) loaves on an ungreased large baking sheet. Bake until pale golden, about 30 minutes. Carefully transfer loaves to a rack and cool 15 minutes.
Step 4
Cut loaves into ¾” slices with a serrated knife. Arrange biscotti, with a cut side down, on a clean baking sheet and bake until golden, 20–25 minutes. Transfer to wire rack to cool completely.
Do ahead: Biscotti improve in flavor if made 1–2 days ahead. Keep in an airtight container at room temperature.
Editor’s note:This recipe was first printed in the January 2009 issue of ‘Gourmet’ as Nonna’s Biscotti.
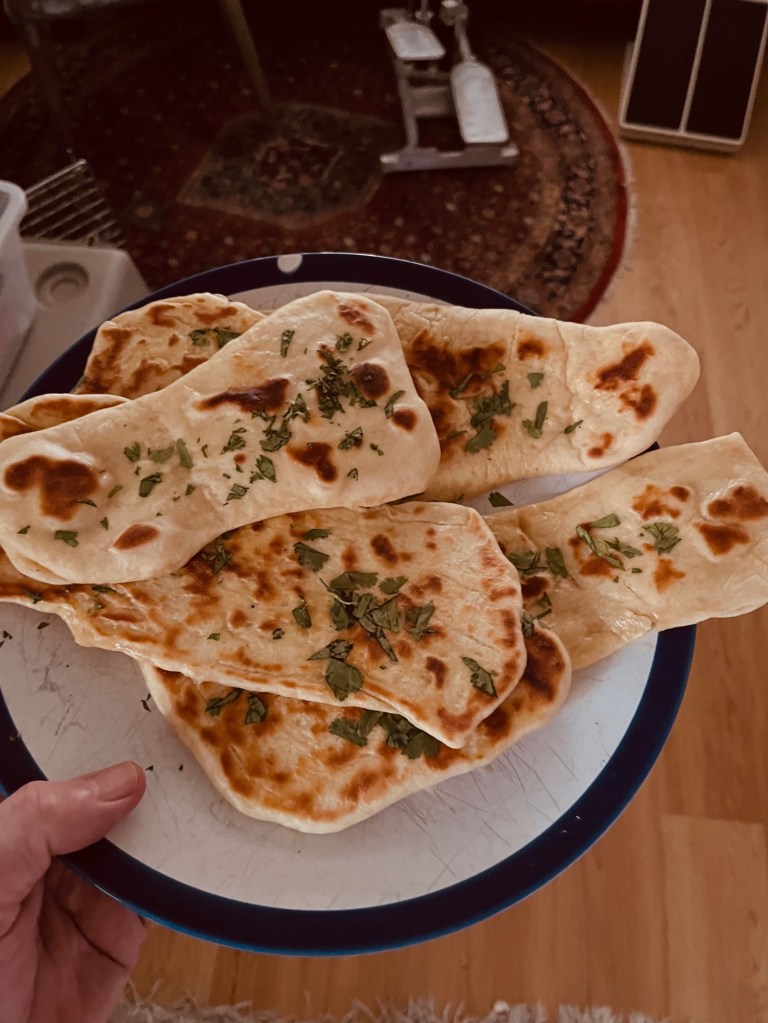
Naan is easy to make and really great when fresh. Soft, puyffy and blistered. It’s such a simple bread. Naturally, we do not have a tandoori oven, but we do have a griddle.
Ingredients:
2 Tbs honey
1/2 cup warm water
1 sachet of active dry yeast
3.5 cups of all purpose flour
1/4 cup greek yogurt
2 stp salt
1.2 tsp baking powder
1 egg
You mix it all together once the yeast is activated, (about 10 mintues). With the mixer on medium low speed, mix till the dough is sticky ball that pulls away from the sides. Shape it into a ball and cover, then into the proofer for about an hour looking for a doubling. Once thats done, you roll out a circle and and cut into about 8 pieces then roll each one out into an oval about a 1.4 inch thick. Drop that on the hot griddle while the next one is rolled out. When the dough begins to bubble, and the bottom starts to get golden brown, flip it and add the next one. After about a minute take th first one off and and the third one, then flip the second one and so on. As they come off coat them lightly with garlic paste, a pinch of salt and some chopped cilantro. Serve warm and enjoy!
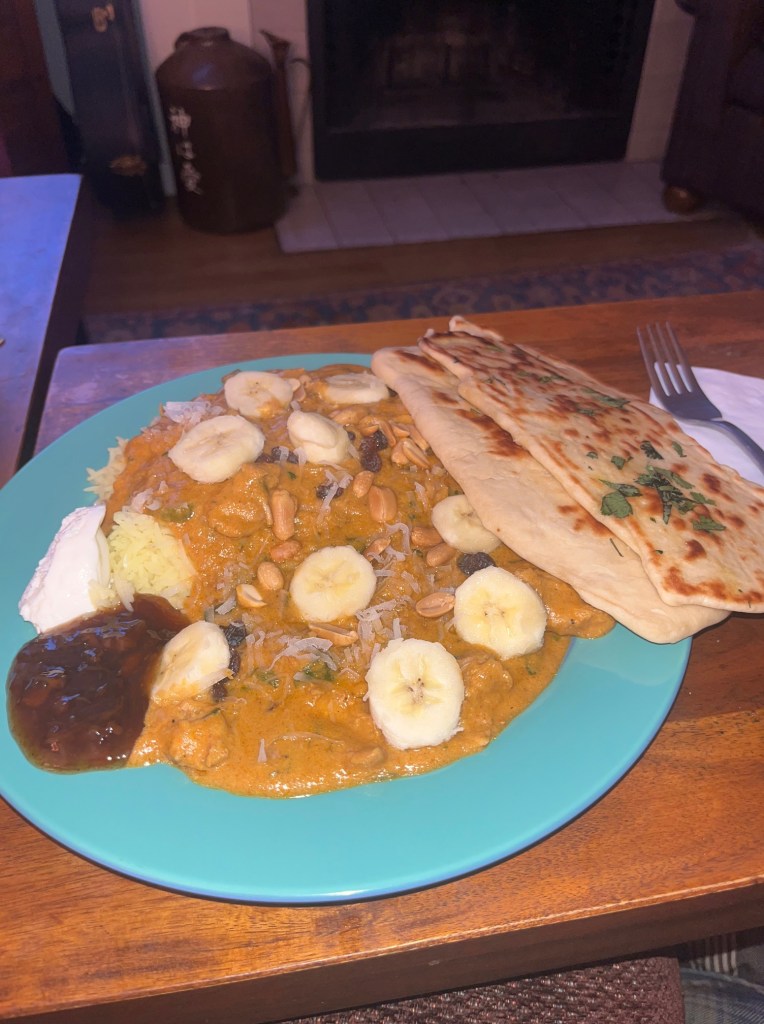
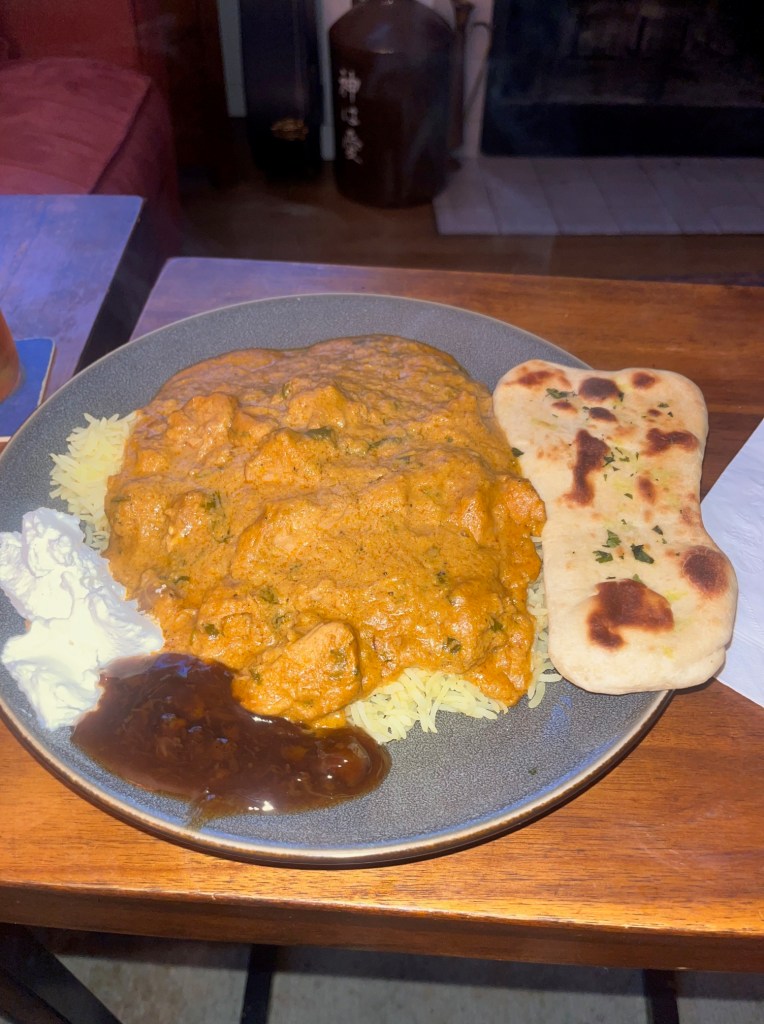
One of my go to Indian dishes when I eat out is Butter Chiken. It’s a classic INdian dish made with marinate and grilled chicken (Tandoori chiccken), simmered in a creamy tomato gravy (curry). The sauce is super silky, buttery, aromatic and mildly spicey. It’s such a beautifully balanced and tasty dish that is a favorite of Indian food lovers all over the world. It’s a dish that layers in flavors. One of the things I learend about Indian cooking is the ginger garlic sauce. You blitz fresh ginger with garlic and olive oil to get a nice paste that is used in so many dishes that many Indians keep a jar of it in the firdge.
The dish begins its flaovor journey with chicken marinating in lemon juice, Kashmiri chili poweder and a lttle salt as its first 20 minute marination, in preparation for the second marination which includes greek yogurt, the gardlic ginger poaste, garu masala, cumin, coriander, kasuri metha (dried cilantro), and tumeric. This marinade should go from 12 to 48 hours.
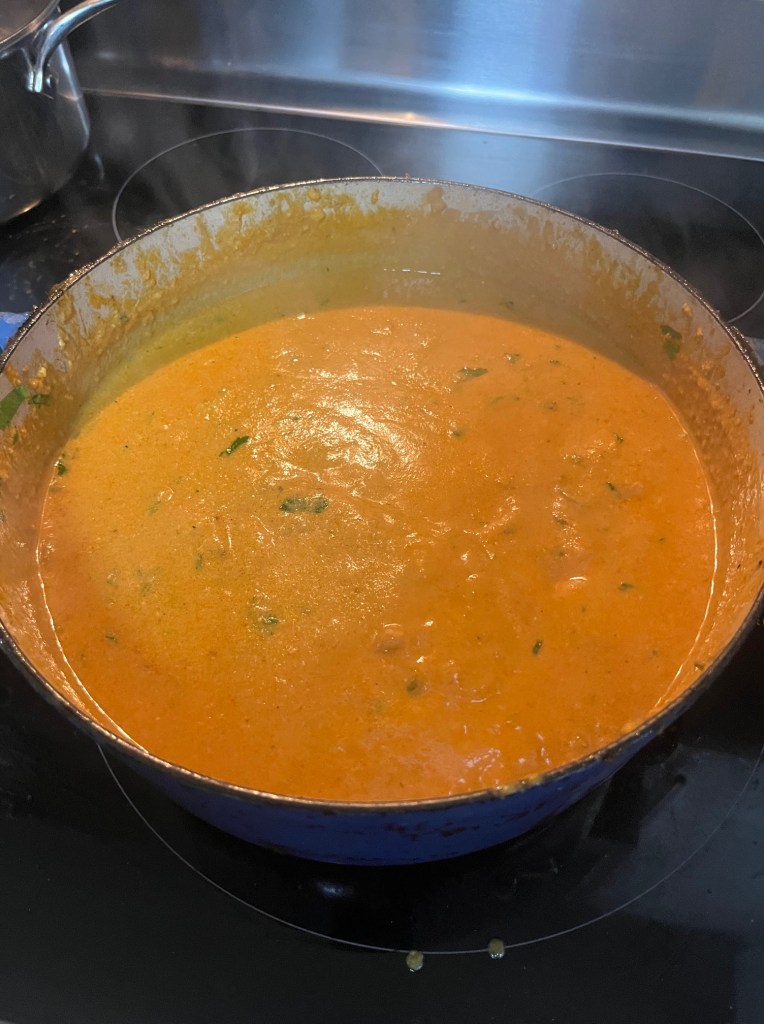
Next you start with the gravy. First, you let chashews hydrate in water in anticipation of blitzing them in the blender along with tomatoes. Not all butter chicken dishes use onion, but the recipe I used did so. You slice ontions and brown them before adding them to the blender with the finely blitzed cashews and the fresh tomatoes.
Next, while the sauce is blitzing, I put the chicken onto a sheet pan under the grill to par cook.
to make the sauce itself you start with the spices. A stick of Cinnamon, cloves and cardemom pods along with the sliced green chilles (I use sorrano). You cook these in butter for a few mintes before adding garum masala, paprika and more chili powder. Next you add the garlic ginger paste and cook it all making sure not to burn it. Then its time to get the blend into the pan, and you can do this through a strainer if its not smooth. enough. Then its time to get this going on medium high heat (avoid the splattering.) You parttially cover it and let it boil for around 10 -15 minutes stirring often till the mix is nice and thick. You add a couple of cups of hot water, and make sure its beginging to come together.
You rpepare to add the chicken from the grill. To finish the chicken in the grill, you want it browned, but not burned. Before you add the chicken, remove the whole psices and discard. Once you add the chicken, you can add a little more more water to get the consistency you desire. Let it cook for another 10 minutes or so. Adjust salt, sugar and add cilantor, and a tablespoon of butter. Take it off the heat, then temper a 1/3rd of a cup of heavy cream and add that to the mixture, and serve it over basmati rice.
We made our rice with saffron and I also made garlic naan. It is such a great dish. A fair bit of work, but great.
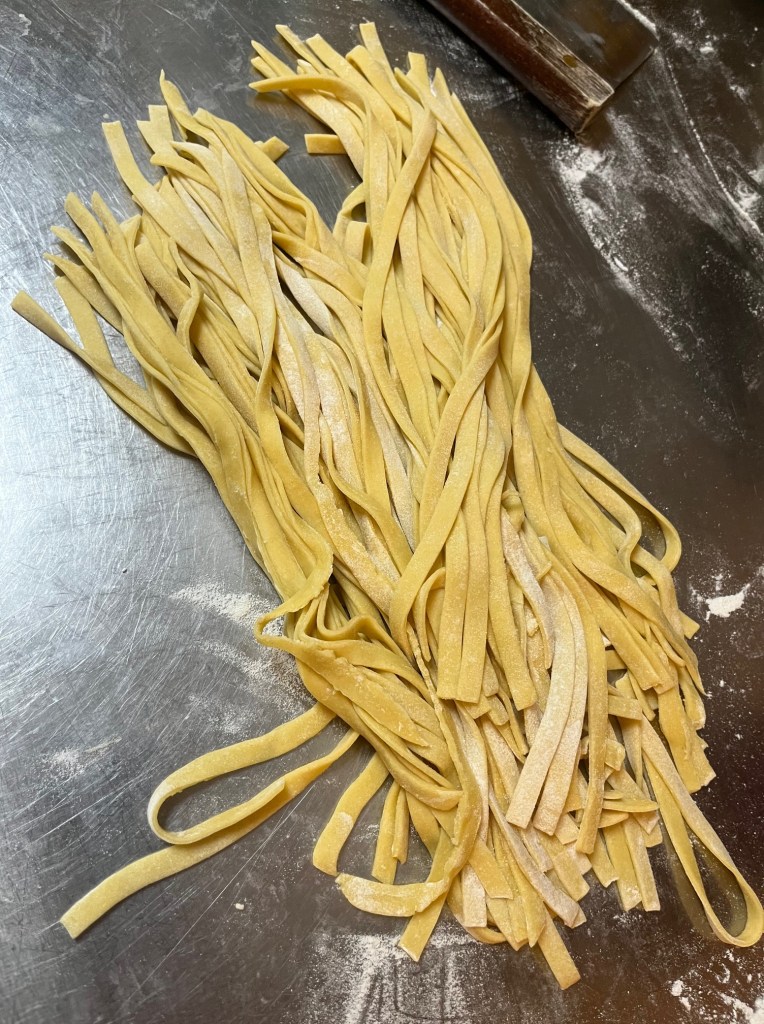
I absolutely LOVE this dish. LOVE it! it’s best with fresh clams, but failing that, canned clams, whole and chopped, are necessary. Now with that out of the way, you have to make fresh pasta.
There really is not anything in the world as good as outstanding fresh pasta.
The ingredients I used for the sauce wete:
Anchovies
Finely chopped shallots
Finely chopped garlic
Red pepper flakes
Lemon zest
White wine
Kalamata olives chopped
Chopped clams
Whole clams
Clam juice
Parsley
Lemon juice
Olive oil
Butter
Pasta water
To start out, I slowly cooked the anchovies in olive oil till they had melted. Then I added first the shallots and the red pepper flakes, then as they softened, I added the garlic, olives and the lemon zest. I deglazed the pan with the wine and cooked it down till about half the cup had evaporated. I added the clams and clam juice then dropped the pasta into the salted boiling water. while the clam sauce was developing I added a little pasta water. When the pasta was floating and just before I added it to the sauce pan, I added the parsley and the lemon juice. I added the butter then the noodles and mixed the noodles with the sauce. I added a little more pasta water till the sauce was nice and silkly.
I served the pasta with fresh made breadsticks and aCeasar Salad along with the rest of the bottle of wine. It was a masterful meal! Heathere said, “That is the best version of this dish you have ever made!”
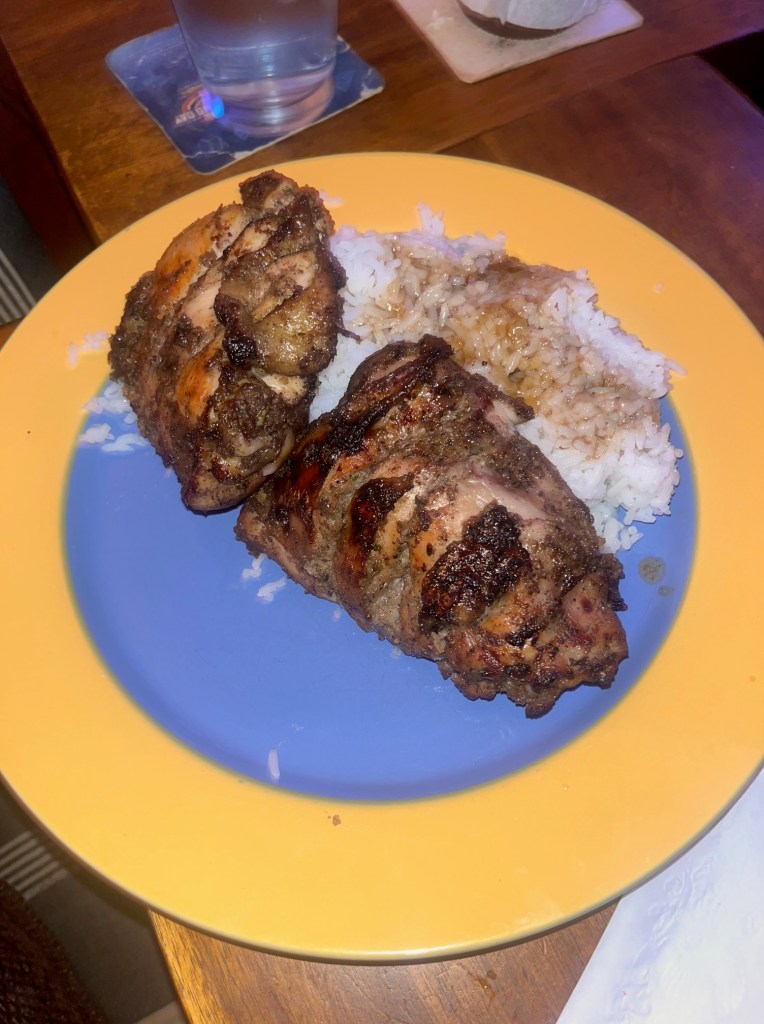
This is a great dish. Midway though the meal, Heather said, “This goes into regular rotation for sure!” It’s an interesting way to make a wonderful chicken dish for sure, but, let me warn you, it’s HOT! How hot you ask? The kind of hot where your hair sweats. Your shirt sweats. There is sweat pouring down your face, and even so, you just cannot wait to take another bite!
The secret is in the marinade.
Jerk Marinade
4 scallions
1 small onion
4 cloves garlic
3 Scotch bonnet pepper (We could not find Scotch Bonnet, so we made it with Habanero, which is pretty similar on the Scoville scale.
1 tbsp fresh thyme leaves
1 tbsp ground Allspice
1 tsp black pepper
1 tsp cinnamon
½ tsp nutmeg
1 tbsp brown sugar
1 tbsp soy sauce
2 tbsp lime juice
2 tbsp vegetable oil
1 tsp salt
Optional: 1 tbsp dark rum
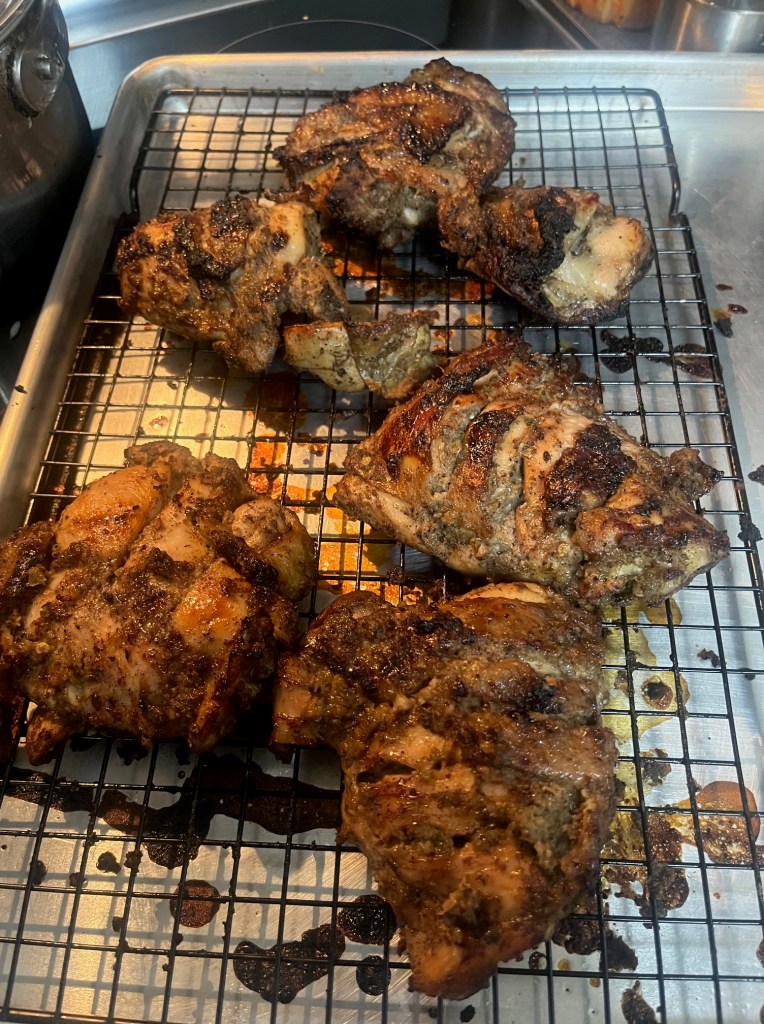
Blend everything into a thick paste. Slash bone in chicken, we used thighs, and massage the spice into the chicken. The outer limit for the marinade is 3 days, but one day will suffice. To prepare for cooking, I used a 12 inch pan, and carefully wiped the bulk of the marinade off the chicken, leaving a thin layer. I let it rest out of the fridge for about 30 minutes before baking to allow it to come to temperature and tighten up a bit. I baked it for about 40 minutes at 375 before putting the chicken on a grid and painting it with the finishing glaze of hot honey, lime juice and a pi9nch of freshly ground allspice, then caramelized the chicken under the broiler, turning and basting it often for the next few minutes till it began to turn.
I let it rest for about 10 minutes before serving it over rice. I used the time to reduce the sauce that was in the bottom of the roasting pan and poured it over the rice.
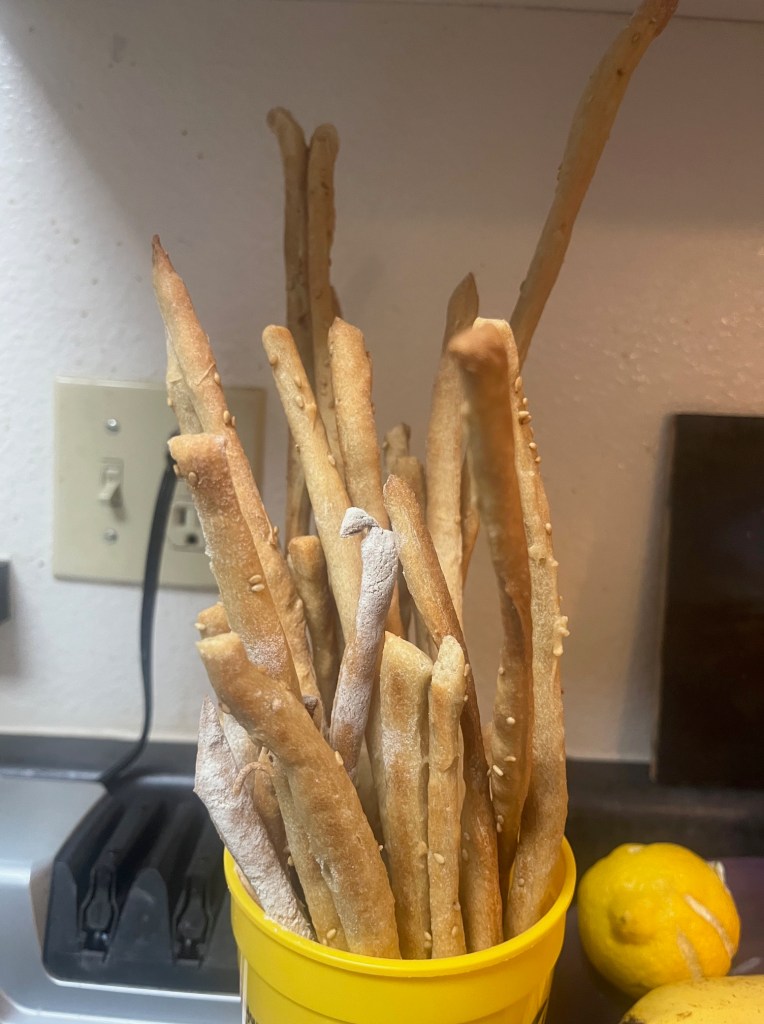
I am on a quest to make the perfect breadstick. Growing up in SA, we had these wonderful crisp sesame breadsticks that I just loved. My first effort was miserable, so I refined the recipe and it’s a little closer. It will get better. More work to do!
Ingredients
500 g bread flour (or all-purpose)
275 g water (55% hydration)
8 g salt
5 g instant yeast
35-40 g olive oil
80–100 g sesame seeds
The secret is to not overwork the dough. The process is:
The Mix
Combine everything except the sesame seeds.
Knead until smooth (about 6–8 minutes).
You want a tight dough, not super elastic like pizza dough.
First rise
Cover and rise 60–75 minutes until slightly puffy.
Not doubled — just relaxed.
Roll the sheet
Roll dough into a rectangle about:
½ inch thick
lightly dusted with flour
Sesame coating trick (important)
Brush the surface lightly with water or egg white.
Then press sesame seeds firmly into the dough.
This ensures they stick and toast beautifully instead of falling off.
Cut breadsticks
Cut strips about:
thinner than thumb thickness
10–12 inches long
Place them on parchment.
One more important trick (almost nobody mentions):
After cutting the sticks, roll them lightly on the counter once with your palm.
This:
compresses large air pockets
evens thickness
gives a more delicate snap
Without that, you get dense cores that feel hard.
Short rest
Rest 10–15 minutes only.
You want very little rise.
Bake
Stage 1 — structure
425°F
Bake 12–14 minutes
They should be lightly golden
Stage 2 — drying (the crunch step)
Lower oven to 275°F
Bake another 15–20 minutes.
This removes moisture and creates the magic crunch.
Final drying trick
Turn the oven off, crack the door slightly, and leave them inside 10–15 minutes.
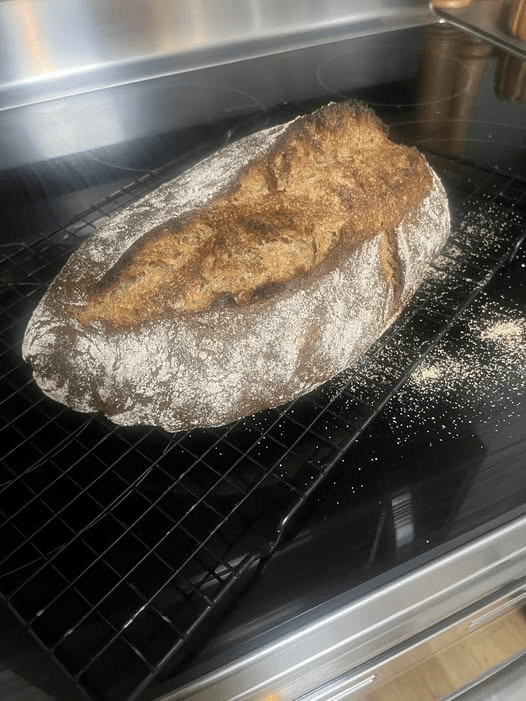
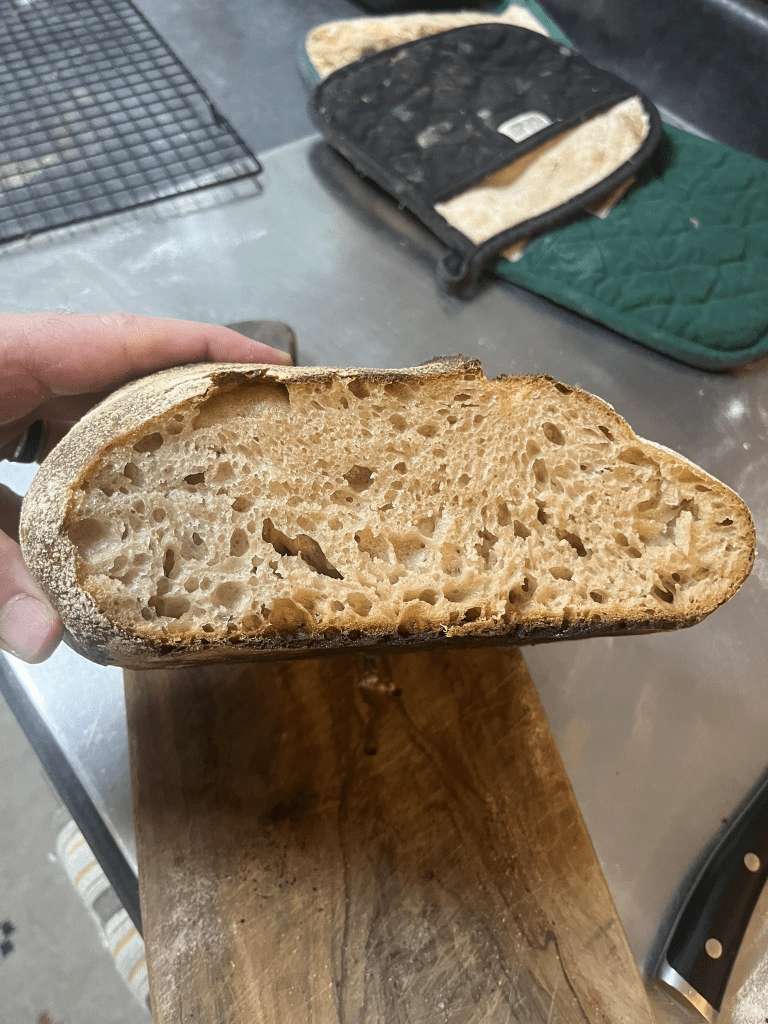
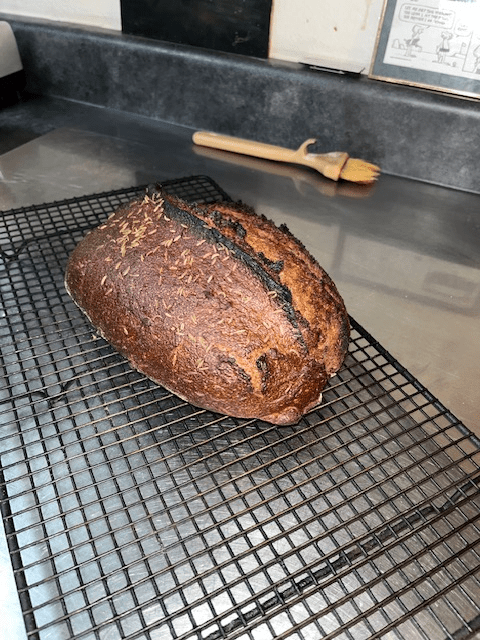
I have had this urge to make a rye loaf. Having never made one before, I was a little surprised at how different the dough is. The dough is pretty wet and sticky compared to regular sourdough, so, it was a little unsettling to work with it blind to what to expect. My experience with sourdough had me proof it for a very long time which seemed to have been the correct decision given how it turned out. Update: It is absolutely perfection! Next on the menu, corned beef on rye and hot pastrami sandwiches!
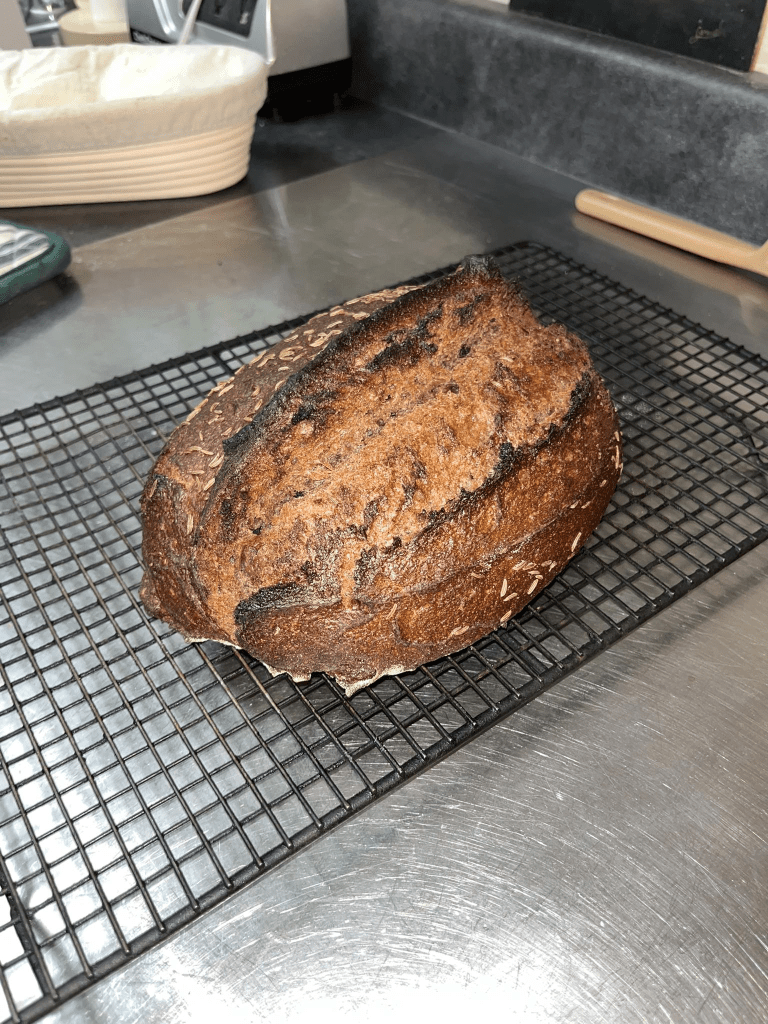
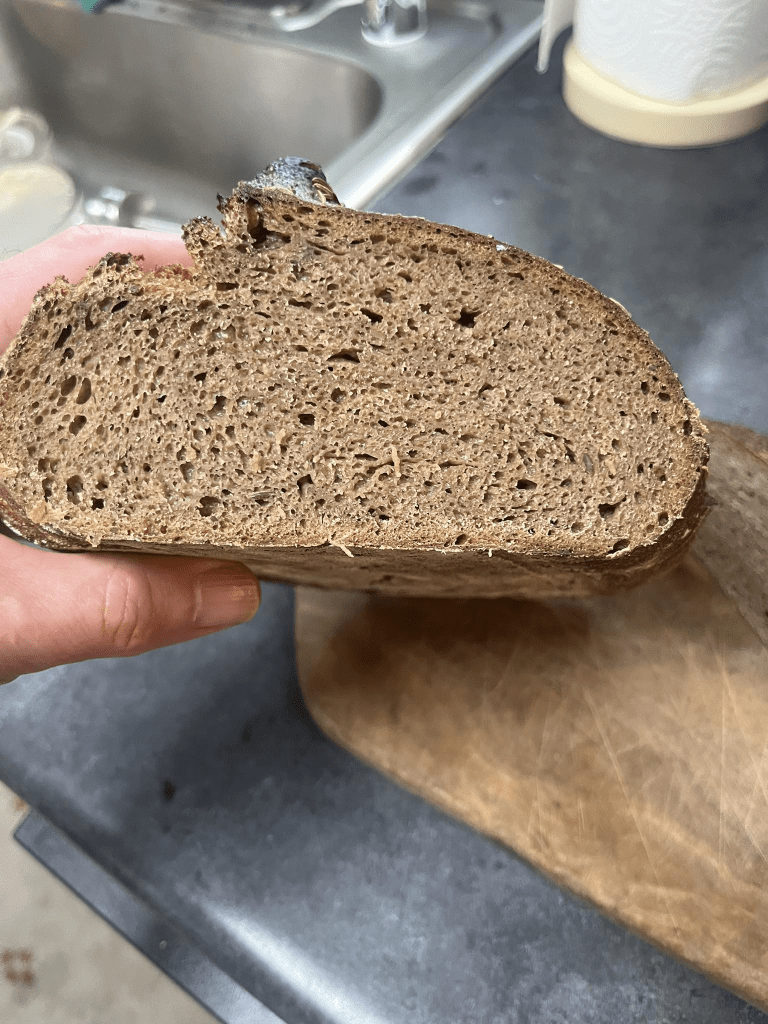
My second attempt was amazing.
the crumb was fantastic. Perfect proofing, no compression, good gas distriubution. All in all it taskes fantastic. So we made sandwiches!
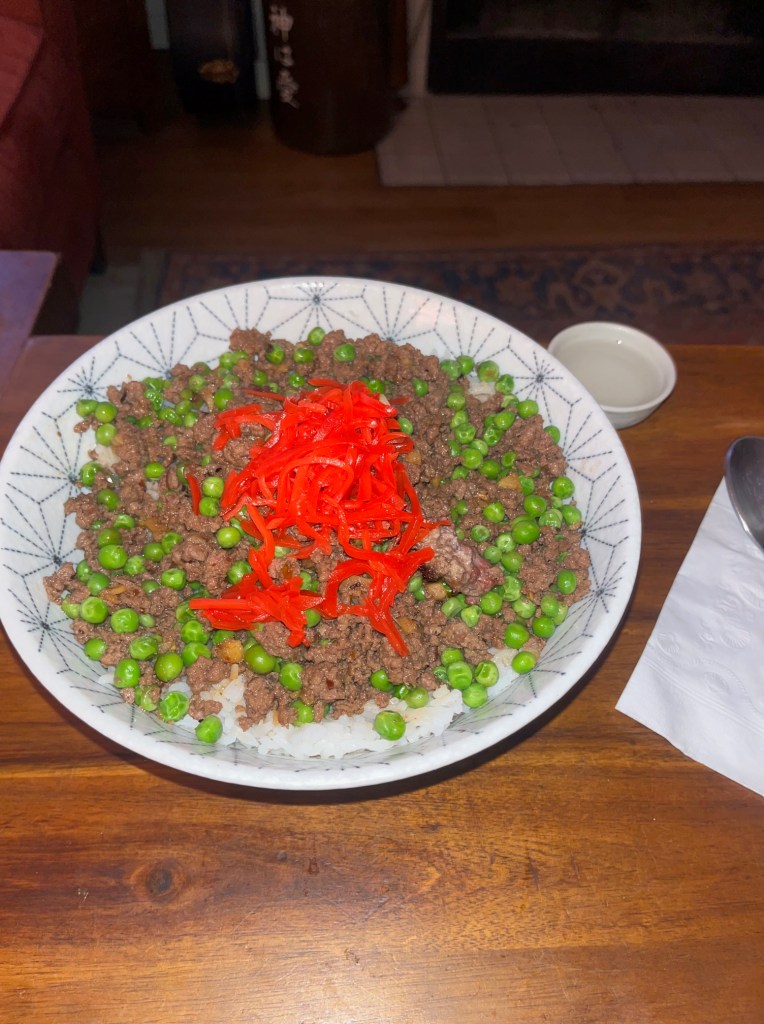
Japanese comfort food is amazingly moreish. Soboro Donburi, Gingery Ground Beef with Peas over Rice, is not just delicious, it’s super easy and quick. You just have to have the ingredients. Sake and Dashi are the two main things you need to find along with soy, sugar and pickled ginger. You also need fresh ginger and I like to add garlic and even a shallot to make it a rounded dish. You start by getting the aromatics fragrant, (I like to add a good bit of red pepper flakes here too,) then brown the beef. You add the sauce and let it braise in the sauce for about 10 minutes. Before the sauce is all evaporated, add the thawed peas and take it off the heat. The residual heat will warm the peas. Serve over jasmine rice and top with a tablespoon of pickled ginger. It’s one of those dishes that is on our regular rotation for a very good reason. It’s delicious and moreish!
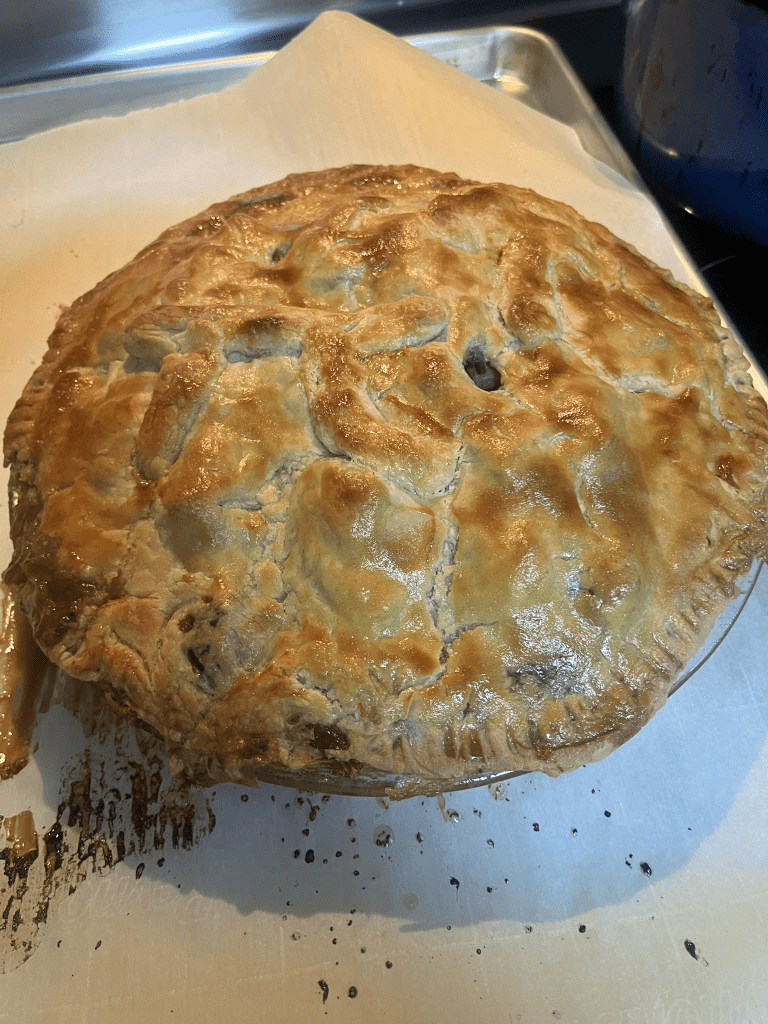
We were feeling like a pastry meal…so Heather requested a Steak and Mushroom pie. I found a great recipe calling for the beef to be braised in Stout. I also made the choice to make the rough puff pastry from scratch. That was perhaps not a great choice, but it still tasted great. The pie itself was put together after the beef and carrots and mushrooms along with celery, thyme, and chicken stock and a bottle of Guiness braised in a simmer for about 4 hours. To enhance the flavor, I had added Marmite, fish sauce, malt vinegar, worcester sauce and soy sauce. It smelled wonderful and before I put it in the pie plate I adjusted the salt and pepper levels for flavor. I used frozen butter for the crust and with a few 2 hour rests in the fridge, it came together nicely. In the end, I allowed the crust to cook in a 350 degree oven for about 45 minutes till broiling it for a minute to get the golden brown I was looking for. WE both enjoyed it accompanied by an ice cold Guinness Stout and a small green salad. (If you look carefully, in the middle, to the left, you can see the Pi symbol we tried to create and there are also 3 mushrooms at the top right that are well disguised!)