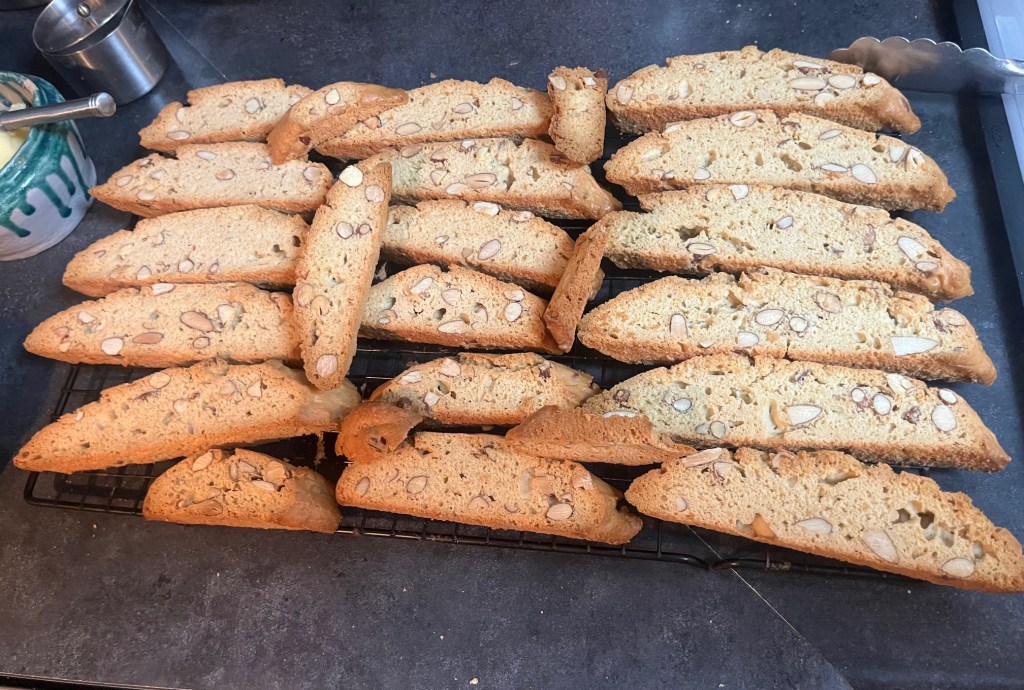
If anyone asks, my favorite food memory from South Africa is Prawns Peri Peri. I remember as a kid, sitting under the big blue and white tent on the beach in Lorenzo Marques (now Maputo) in Mozambique, eating piles of red hot Tiger Prawns till the tears ran down my face. My mom used to say about me that I only ate 3 things as a kid, Lamb chops, Chinese food, and prawns peri peri.
I had to figure out how to make them as an adult, and luckily was able to find Peri Peri powder from an online South African Store (https://www.africanhut.com/) which has been a great resource for me for a few items. In any event, my recipe is to marinade the cleaned prawns in a marinade of lemon juice, olive oil, loads of finely chopped garlic and a pile of chopped parsley, along with a good amount of peri peri powder (your mileage may vary. Peri Peri is equivalent to the Birds Eye pepper on the Scoville scale. It’s hotter than cayenne, similar to or slightly hotter than Thai bird’s eye chili, and usually not quite as hot as a habanero.)
Then to make it, I always make jasmine rice.
To cook it, ideally, I prefer to cook it over an open flame on the BBQ, but we do not have access to one at our apartment, so I cook them on the stovetop. I use a good size brasier and melt some butter, with olive oil, fresh peri peri powder, and some fresh garlic. When the garlic is softened, I add the prawns, I keep the temperature high and make sure to turn each one over so that they get cooked through, I add any marinade that is left, add a couple hits of angasturabitters, and squeeze a lemon over them to finish. Dish them up over the rice, pour the sauce over the shrimp and go to town. Have ice cold beer available.
These prawns were pretty small, but they were still very tasty!
Our world tour of soup took us to Vietnam this week, and there is only one soup that can be considered the national dish in Vietnam, that, absolutely, is pho. We live in an area of the world where there are multiple pho restaurants around, which makes it hard to consider making something that is time consuming and labor intensive when for about $20 you can have a perfect soup in about 10 minutes. Something else about pho for me, is that being that I am not from Vietnam, I have no real sense of their ingredients or the way they build flavors beyond eating Vietnamese foods. So, I did what I always do, which is to surf recipies till I find one that is pretty good, well laid out and easily duplicatable. Then it’s down to getting the ingredients. Building pho is a process of layering in flavor. You start with marrow bones and meaty bones (I substituted Ox tail for that part since there were none available.) First you boil the bones for about 5 minutes with the brisket, then you wash them all off and start again. As you are bringing a pot of water to the boil, you scale a couple of onions and gingers, and you roast the spices, including star anise, cardamom, coriander and cinnamon. Then, when the pot comes to the boil, everything goes in, the bones, the meat, the onions and garlic and the spices. That simmers for 3 hours before you pull and save the brisket, and strain the broth into another pot. (I saved the marrow bones because I love marrow on bread!) The broth is flavored with fish sauce, salt, and sugar till its just right.
To serve you have to get the rice sticks (noodles) softened and ready, which we just about got right, and you prepare the sides. In this case, bean sprouts, cilantro, korean peppers, and the thinly sliced meats (including some of the brisket). Then, of course, you need hoisin sauce, siracha and garlic chili to make the dish sing. It’s a truly great soup.
The second day of the meal, which we had a couple days later, was even better. This time, I got the rice sticks )noodles) right. My god, what a delicious dish.
I have mentioned that I love the cookbook Frankies Sputino. They have broken down their recopies so that a home chef and literally cook them to the same level of excellence they do in their restaurant. Once we discovered lamb shoulder was available, their Lamb Ragu recipe jumped off the page. What makes this recipe cool is that it is a 2-3 day recipe to make and it creates a fantastic ragu that serves 8. This means that we will have at least 3 additional meals from it. (They tell you where in the recipe to store it before finishing the dish. On day 1, you start out before you even get a chance to roast the lamb, by making a veal stock. To do this you roast veal bones in the oven, then you cover them with water and aromatics before simmering the bones for 4 hours. On day 2, you next, salt and pepper the lamb before roasting it at high temperature for about 45 minutes. While its roasting, you saute carrots, celerty, onion and fennel till they are heavily caramelized. When the lamb is roasted so it is clearly crusted you put it in a braising pot along with the vegetables, fresh tomatoes (crushed by hand) and parsley stems along with the veal stock made the day before.. Then it all sits covered in the braising pot for 2 hours in a 300 degree oven. When it comes out, you strain the stock, discard the vegetables. You set the lamb aside to allow it to cool. The stock is refrigerated and lamb, once cooled is pulled apart with forks, and is also refrigerated.
Day 3 is the day to eat. There are two things to do. One is to make fresh pasta for the tagliatelle needed for the dish. My strategy was to make it a little thicker than fettucine but about 4 x the width. Then you build the sauce with crushed Italian tomatoes.
The Tagliatelle is perfection. Now the sauce is getting friendly with the tomatoes, then the lamb goes in and from there w build the ragu.
Skimming the fat off the stock, and then allowing it to come together with the Italian tomatoes before adding the pulled lamb, gets the dish to the place where you can set some aside for another meal. After that, you build out the final dish with a few ladles of the ragu. To finish the dish, you add butter, Italian parsley, white pepper, salt and ultimately, the tagliatelle
You let the pasta sit in the sauce for a minute before serving and then to serve, you load pasta onto the plate, cover it in the ragu sauce and finish with tarragon and a little olive oil.
It’s not just a beautiful dish. It is spectacular. The way the tagliatelle with it’s soft folds invites the sauce. The depth of flavor that the process creates. The hints of fennel, the brightness of the tarragon, and pure perfection of the bite of the pasta. I loved this dish and will keep in in the rotation!
To be honest, I literally licked my plate clean! I will make one more note. To accompany the dish, I made the tomato, red onion and avocado salad that is literally like putting a gazpacho in your mouth between bites! It too is a winner.
Because it is a fairly significant cook, there will be at least 2 more meals for us to look forward to. This is what was left after the meal for us to save for later.What is great about this is that to get to the finished dish from here is very simple. It gives me a chance to tighten up the sauce a tad too.
As I have said many times now, every single dish I make from Frankie’s Sputino kitchen companion and cooking manual is brilliant. Honestly, the evening was a full culinary symphony — from the pasta to the ragu to the salad and wine, it all flowed together beautifully.
Heather kept saying, “I ma having a moment!” as she dug into her plate.
There is so much to like about Thai flavors. This soup leverages them all. It’s an easy brothy soup that is two parts, the marinade for the chicken, and then the broth. I marinaded the chicken in bite size pieces, although the recipe does not call for that. You use boneless skinless thighs that you lay on a bed of jasmine rice when you serve. This is a broth heavy soup where the broth does most of the work. It’s so delicious and so moreish and so easy. Definitely one of the contenders for “The best version chicken soup”. It’s pretty easy to make, you just need the right ingredients. The other thing about Thai food is that its HOT and makes your hair sweat! You can ramp up the heat with that Thai chili sauce and add an extra serrano pepper or two. But the sweetness and tanginess of the coconut broth with lemongrass and a touch of lemon juice to finish it is so moreish. I used a little fish sauce and a touch of rice wine vinegar to ramp up the umami. After you marinade the chicken, you sear it in a pan, make sure the sauce caramelizes, then set it aside for serving.
For the chicken marinade:
Boneless chicken thighs
Crushed pepper
Grated garlic
Grated ginger
Grated lemon grass roots
Chilli oil
Soy sauce
Red chilli sauce
Lemon juice
Honey
Oyster sauce
Red chilli flakes
Olive oil
For the broth
Olive oil
Onion petals
Thinly sliced ginger,
Green chillies
Spring onion whites
Kafir lime leaves
Lemon grass roots, crushed
Lemon grass greens, roughly chopped
Water
Coconut milk
Salt
Lemon juice
To serve:
Jasmine rice
Spring onion greens
You put a pile of rice in the bowl, top it with the chicken, if you do not marinade in bite size pieces, then cut into bite size pieces. Top with the broth and the green onions, add chili sauce and a little lime juice, sit back and enjoy!
Growing up, we had a roast leg of lamb as our sunday dinner for as long as I can remember. I have not had it since my mom moved into an old age home 20 years ago. We were shopping at Costco the other day, and they had boneless leg of NZ lamb at a very good price, so we picked up a 5 pound leg.
One of the things that I LOVE with lamb is mint sauce. Heather had never had either leg of lamb, or mint sauce, so she was very excited to make it happen.
First I unrolled the leg, and then I made a rosemary, garlic, salt and olive oil spread that I laid across it all before I rolled it and then tied it using my best version of chef’s knots. (Not good!)
Next I put slits around the meat and placed thin slices of garlic in each slit all around the meat.
That went into the fridge overnight, before being cooked over a deeper pan on a grid over a water bath. I went hot, 450 F for 15 minutes, then about 15 minutes per pound at 350 looking for an internal temperature of 130 degrees.
While the lamb was roasting, I made mint sauce with water, rice wine vinegar, a little salt and sugar to balance it. I use about a cup of finely chopped mint, two table spoons of sugar, about a half cup of vinegar and about a cup of water along with half a teaspoon of salt.
In addition we roasted potatoes with rosemary and garlic, and made roasted asparagus )salt, pepper and olive oil.)
All in all, it was an amazing meal. Heather LOVED it, esp the mint sauce with the lamb, and for me, it was a real throwback to my youth. I really channeled my mom as I was in the kitchen pulling it together.
Food was an interesting thing for me in those days.
I usually ate millie pap and gravy for breakfast made by the maid. She used sour porridge and made the yummiest savory stew to go along with it. To this day I still prefer a savory breakfast. For lunch I often had a cheese sandwich or a hot dog sandwich or my favorite toasted cheese and tomato. Yum! I still make toasted cheese and tomato at every opportunity, and I have been working on a refined version of millie pap and gravy.
We also had a puffed wheat cereal that I ate dry by the handful. I hav enot been able to find anything like it in America.
My mom used to say that I “only ate three things”. Lamb chops, grilled prawns and Chinese food. Which was defintely true.
Sunday nights we usually had chops and chips (lamb chops and French fries) – I loved those meals, still do.
We had a formal dining room and ate dinner as a family served by Abbiott, the Gardner by day, white-coated waiter by night. My mom had a little bell and would ring for the servants to bring the next course or take away dirty dishes. We literally ate 3 course meals every day. Nobody was allowed to leave the table till everyone was done and I always struggled to finish what my mom dished up for me. I Remember people sitting staring – glaring at me really – saying “eat Neil” over and over while I ignored them. I sometimes would get my cold dinner from the night before, for breakfast the next day. It wasn’t always like that. We all used to fight over the bone marrow in the soup, the roasted potatoes, and the bread-and-blood drippings when Meat was carved. I still have a serious craving for those tidbits.
What is so odd about that, is that today I have a very expanded and developed palate. I eat pretty much everything, and my self-expression is that I LOVE to play in the kitchen!
In the Seattle area, there is a pizza place called Pagliacci, and they are among our favorite pizza locations. They make interesting pizza’s and have a wonderful crust. Among the best of their pizza’s from our perspective is the Agog Pizza. This is a garlic infused olive oil base pie with roasted garlic, mushrooms, kalamata olives, Goat cheese, Fontina cheese, mozzarella cheese, parsley and fresh tomatoes. It’s consistently a great bite of food. The brininess of the olives, the funk of the goat cheese, the umami of the garlic, the chew of the mushrooms, the acidity and freshness of the tomatoes and parley, this pizza has it all. Except sauce!
Ingredients:
Garlic infused olive oil
Roasted garlic
Sliced mushrooms
Kalamata olives
Goat cheese
Fontina cheese
Mozzarella cheese
Chopped parsley
Chopped fresh Roma tomato
This was our first bake with the new dough, I was still learning how to use the pizza stone and gauge the new oven temperatures, so this pie was a little under. The flavors were there, but we have to try it again with a proper bake.
We chose to revisit the Agog, making sure this time, to get the bake right. It is a really great pizza! Unfortunately, we were out of fresh tomato when we took another stab at it.
the Dutch Baby is one of my go to Sunday breakfast treats. I have spent years perfecting it! LOL It’s so easy to make that even a novice can turn out a world class Dutch Baby.
Ingredients:
3 eggs
Half a cup of milk (I use 2%)
Half a cup of all purpose flour
1 Tbs of sugar
A generous pinch of ground nutmeg
The way I make it is that I drop the ingredients into a mixing bowl, then using a hand mixer, make sure its all mixed in. Let it rest, in total for about a half hour, while the oven, which you are pre-heating to 425 degrees is getting hot. Make sure to put a clean large frying pan in the oven so it gets hot as the oven gains temperature. Apparently, resting the custard allows the glutens to bind. Anyway, when the oven comes to temperature, add a half stick of butter to the frying pan.
While the butter is melting (which does not take long at that temperature), give the custard another mix with the hand blender, then (using a serious oven mitt) put the frying pain on top of the stove and pour all the custard into the pan, then, again, using a serious oven mitt, put it back in, close the door, and wait a minute till the oven heats up again after having the door open.
What I do next is change the temperature to 400 degrees and once it hits 400 degrees, I set the timer for 20 minutes.
Now here is where you need to know your oven, we just got a new oven, and it’s way more efficient than the last one, so I check it at 17 minutes. This one came out at 18 minutes.
The way we eat this is that we split it down the middle, and today, Heather made a lovely, tangy, tasty berry compote to go with it.
Growing up in South Africa, sausage rolls were one of my favorite snacks. I love meat pies generally, and I also have made Cornish Pasties, Steak and Mushroom Pies, Curry Beef and Curry Chicken pies and more. But, Sausage Rolls are a favorite.
Ingredients:
Medium Brown Onion
I lb of regular sausagte
1 lb of spicy sausage
Regular bread crumbs
2 eggs
Sea salt
Pepper
Cumin
Peri-Peri
Puff Pastry
I like them peppery and spicy. The way I make them is I first caramelize chop the onion. When it cools, I add them in a large mixing bowl to the sausage, and I break one egg into the mixture. I mix it well, assessing the moisture, then I add breadcrumbs, usually about a cup, which helps absorb the moisture. When the mixture feels about right, I add a teaspoon of cumin, a table spoon or two of black pepper, a teaspoon of sea salt and a table spoon of peri peri. I mix it up well to distribute the spices evenly and let it sit, covered in the fridge for a few hours or as long as overnight.
First I preheat the oven to 350.
Then I lightly flour a rolling surface, and roll out the puff pastry. I spoon a long strip of sausage along one side and roll it over so its covered. Then I massage it to get the spread even. I cut off the stop from the rest of the dough, then cut the rolls into bite sizes and place them on a lined cookie sheet. I repeat until the dough is used up. Once all the sausage rolls are on the cookie sheet, I take the second egg, beat it with a little water to make an egg wash. I make sure all the rolls are painted with the egg wash and into the oven it goes. At 30 minutes I check the doneness, and either add more time at the same temperature or, if I want them darker, increase the temp to 400 for the next few minutes. I watch them closely to make sure they don’t burn. I put them on a wire rack to cool. Then when I serve them, I serve them with brown sauce (HP Sauce)
When I first tasted Pad Thai, I honestly had a sense that this was the food for me. The Thai flavors are amazing and Pad Thai is one of my very favorite meals. When it comes to Pad Thai, what I prefer is the more authentic version of the meal than the more Americanized version. The very best recipe I found was this this one for Authentic Pad Thai from Hot Thai Kitchen
LIke with all recipes, I use them as a starting place and fiddle around with it from there. The key thing to pad thai are the ingredients. We are lucky here in the Seattle area to have access to all the ingredients that one might need from anywhere in the far East.
3-4 TBS of Tamarind Sauce (It’s pretty sour, so depending on your preferences use more or less. I use 4.
2 TBS of fish sauce
To make the fish sauce, start with the palm sugar, adding it to a small pot so it melts over medium heat. Once the sugar begins melting, stir until it begins to caramelize, and darken in colour. Immediately add the water, the fish sauce, and the tamarind paste. The sugar will likely harden immediately, which is fine.
Bring sauce to a simmer, then turn off heat. The hardened sugar will probably not have dissolved at this point, even so, let it sit while you prep other ingredients which will give it time to dissolve by the time you need it. Check to make sure that it is dissolved before you start cooking. If it isn’t, warm it and stir it till it is!
Pad Thai noodles are rice noodles that need to be soaked for an hour or so before you drop them in the wok. You need about 4oz (115g) dry rice noodles, medium size, soaked in room temp water for 1 hour. It’s a great idea to cut the soaked noodles in half so they are easier to handle in the wok.
Next I prepare the other ingredients and mix them in a bowl:
The tofu needs to be pressed. Start with a firm tofu, and press it. I put a heavy bottle on top of the tofu till the water stops coming out. Then chop about a third of the brick it into small blocks, and drop them in the bowl.
Add 2-3 TBS of roughly chopped dried shrimp
Add 3 cloves or so of finely chopped garlic
Add a 1.4 cup of roughly chopped shallots
Add 3 Tbs of finely chopped sweet preserved daikon radishes
Add dried chili flakes to taste
Heat the wok with just enough oil to cover the bottom, then sear the shrimp (or chicken or whatever protein you use). We prefer shrimp. I get 10 good size peeled and deveined shrimp, and sear them in a little olive oil with garlic, remove from the wok and set aside.
You also need:
2 eggs
2 1/2 cups of loosely packed bean sprouts
7-10 stalks of garlic chives cut into 2 inch pieces
1/4 cup of roasted peanuts roughly chipped
A lime quartered
To make the Pad Thai,
In the same wok over medium heat, add a little more oil if needed, then add everything in the tofu bowl and sauté for a few minutes until garlic starts to turn golden and shallots are wilted. If the wok looks dry, add a little more oil. (Important: Don’t skimp on oil otherwise the noodles will clump up together.)
Turn heat up to high then drain, and add the noodles and sauce. Keep tossing until all the sauce is absorbed.
Once sauce is absorbed, you can turn off the heat and taste the noodles for doneness. If they’re still undercooked, add a little more water and continue cooking, being careful not to add too much water!
Once noodles are done, push them to one side of the pan. Add add little extra oil to the empty space and add eggs. Break the yolks, then put noodles on top of eggs and cook for about 30 seconds. Flip and toss to mix eggs into noodles.
Toss the cooked protein (shrimp) back in, plus any collected juices. Then add bean sprouts, garlic chives and half of the peanuts.Turn off the heat and toss until well mixed.
Serve immediately with a lime wedge and extra peanuts on top. For a classic presentation you can add a little extra side of bean sprouts and some garlic chives garnish.